How to Make Washing Soda

I’ve spent more time than I would ever have imagined on experimenting with making washing soda by heating baking soda in my oven. I thought that today I’d give you a summary of how to make washing soda and some secrets to determining when the process is complete.

Why make your own washing soda?  Because it’s often hard to find in the store.  And because if you do it right, you can easily make it for less than the cost of commercial washing soda.

So here is the very simple process – How to Make Washing Soda

Bag of baking sodaYou will need a glass casserole dish (or other oven proof dish) and about two cups of baking soda.  The dish must be glass because the washing soda will react with metal pans, especially aluminum, and may damage the pan.

Put the baking soda in an even layer in the casserole dish.  Use about two cups, or whatever quantity makes about a 1″ thick (or smaller) layer in your pan.  The thicker the layer, the longer it will need to be heated and the more it will need to be stirred while heating.

Now place the baking soda dish in the top rack of your oven.  Leave it there while you do your normal cooking.  Leave it there even when the oven is off.  Every few times you use the oven, take the dish out and stir the baking soda and put the dish back in the oven.

Let the baking soda sit in the oven for a week or so until you have about six cumulative hours of heating the oven to 375 degrees or higher.  By then it should have converted to washing soda.

Although it works to simply heat the baking soda alone for about 3 hours at 375 degrees, I don’t recommend this because the expense of heating your (gas) oven for 3 hours would be about $.34 an hour for a total of $1.02.  That would actually make your homemade washing soda cost more than the washing soda you could purchase in the store.

If you could find it in the store, that is.

If you normally cook at temperatures above 400 degrees F, then you may find that your baking soda converts faster.  You may also need less time if you start with very small quantities of baking soda.

Use the tests below to determine when you actually have washing soda. If your tests show it has not converted yet, just put it back in the oven and continue heating.

How can you tell if your baking soda has converted to washing soda?

There are several ways that will help you determine if you have made washing soda:

Secret 1:  The volume of the soda has increased.  Heating about 2 cups of baking soda will convert to about 2-1/2 cups of washing soda.

If the volume has not increased, put it back in the oven for more heating.

Secret 2:  Dissolve a tablespoon of the powder in about 1/2 cup of clear water.  Washing soda will dissolve quickly and stay dissolved.  Baking soda will need to be shaken, stirred, shaken again to get it to dissolve.

Then let the solution sit for about 15 minutes.  The washing soda solution will stay clear.  The baking soda solution will develop a layer of white powder on the bottom of the cup after 10-15 minutes.  That’s because you thought the baking soda dissolved in the water, when in fact it was just fooling you.

Secret 3:  Look closely at the texture and color of the powder.  Baking soda is a brilliant white and the particles look like very tiny grains of white sand or sugar.  Washing soda has a subtle gray cast (compare it to unheated baking soda) and the texture is more powdery, like a fine talcum powder.

The difference is subtle, so don’t be discouraged if you feel that you are just guessing that the color and texture has changed.

Secret 4:  Do a pH test on the washing soda.  Dissolve the washing soda in a 1/2 cup of filtered water.  The washing soda solution should test alkaline with a pH of 11.6.

Here is a photo of baking soda:

Baking soda


And here is a photo of washing soda:

Spoonful of washing soda


Once you’ve made the washing soda, keep it in a sealed container. I use a 32 oz size yogurt container, but you could use a zippered plastic bag, a clean jar, or any container with a lid.

To boost your laundry detergent, use about 1/4 to 1/2 cup of washing soda per load. It can also be used as a heavy-duty cleaner – just mix with a little water to make a paste or more water to make a spray solution.

Remember that washing soda is caustic. With a pH of 11.6 it is more alkaline than ammonia which has a pH of 11.5. Bleach has a pH of 12.6. Don’t let washing soda powder or solution come in contact with your skin.

You can read the details of my seriously flawed pH test and the later successful pH test as I tried to determine whether I had actually converted the baking soda to washing soda.

Enjoy the process and savor the savings! That’s The Fat Dollar way.

Simple Secrets for Money Management

Learning to manage your money can be the difference between a life a struggle and a life of ease.  Learning money management is not cpink pig bank flying on a dollar billomplicated.

Here are some secrets for a life of financial strength from Northwestern Mutual Chairman and CEO John Schlifske that he shared with a group of students from St. Louis University:

1.  Don’t try to beat the stock market.  Just make sound investments.

2.  Do not borrow money to fund a lifestyle you can’t afford.

3.  Learn to live below your means – in other words, live on less than you earn.

4.  Always put aside an amount in savings.

5.  Although it’s not as “sexy” to drive a car that might not be as nice as your neighbor’s, in the long run you will have a much better life if you can learn to live within your means.

John also says that being in a position of having to worry about being able to pay your debts makes you lose options in life, limits your freedom to easily change jobs, and even limits your ability to have the funds to take advantage of investment opportunities.

Thumbs up from The Fat Dollar!  We’re here to help you learn to live well on the dollars you earn.

It All Started With A Bag of Stale Marshmallows

Colorful marshmallows
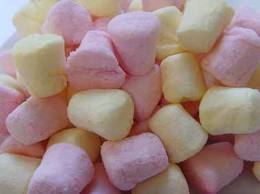
As I was cleaning out the kitchen shelves – part of my quest to declutter the entire house – I almost threw away a bag of stale marshmallows.  As I carried them across the kitchen, the image of the dried little marshmallows in the boxes of hot chocolate mix came to mind.  So I saved the bag and did an experiment by making myself a nice mug of hot chocolate and then putting a small handful of the stale marshmallows on top.  It was delicious!  I was so glad to have saved the bag.  I wondered what other uses I might have for these marshmallows. Thus began my quest for uses for stale marshmallows.

You can read more on the article I posted on The Fat Dollar – Uses for Marshmallows.  Did you know that stale marshmallows can be softened?  Yes – just put a piece of soft, moist bread with them in a plastic sealable bag for a day or two.  Or put the marshmallows in a dish and heat them in the microwave with a cup of water on the side for about 10 seconds.

I also found recipes for making your own marshmallows, and lots of other uses.  My favorite tip was to use them to keep the plastic wrap or foil from touching the icing when you are wrapping a cake.  (Put the marshmallows in strategic places on the cake and just remove them when done.  And yes, your stale marshmallows work just fine for this one. )

Marshmallows are inexpensive, so the savings are not huge – $.99 to $2.50 for using a bag of stale marshmallows instead of throwing them away – but it’s fun and the research was interesting and there was money savings, too – so that makes it The Fat Dollar way.

Make a Refrigerator List to Save Money on Food

Editor’s Note:  Updated July 2019

Blank noe sheetWe’ve all had experience with the grocery shopping list. Myself, I have a magnetized notepad right on the refrigerator and as soon as I notice we need an item, I jot it down on the notepad. Then when I’m ready to go grocery shopping, I just tear off the top sheet and I have the start of my shopping list. It works great in saving repeat trips to the grocery store.

There’s another list for the refrigerator that I only recently discovered and it has already began to help me save money on food. This is a list of what’s in the refrigerator, instead of the shopping list which shows what is not in the refrigerator.

I’ve been on a quest for the last few months to cut back on our monthly grocery spending while increasing the quality of our meals. I’ve made good progress with a variety of methods, like cooking meals ahead, using some coupons, studying the store ads, and growing some of our own food.  Even so, every time I cleaned the refrigerator, I was throwing out food that had been forgotten, and therefore spoiled. After working hard to cut down on our spending, it was very discouraging to discover wasted food. It’s like throwing money in the trash can.  It feels even worse when the spoiled food was a favorite dish or fruit that we would have enjoyed … a week earlier.

Some of the methods I tried were somewhat effective, like having a special shelf just for leftovers, or a special night for cooking with leftovers.  They didn’t give the results I wanted because I  didn’t really keep these systems up very well.  I needed something simple, yet workable!

I keep a list of foods that are in the freezer that works quite well and it made me wonder if it would work to keep a list of the food in the refrigerator.  At first it seemed way too cumbersome – so much activity of food going in and out of the refrigerator, and such a headache to list them all.

Then I realized that it is really only a half dozen or so things that were the problem areas.  I really only needed to keep track of the leftovers and any other highly perishable item.

For me, this includes things like fresh mushrooms, fruits and vegetables in the crisper drawers-(I’ve thrown out more brown lettuce heads than I care to share) – open packages of cheese, restaurant doggie bags, and packages of lunch meats.   Milk, eggs, and fruit juices have a high turnover and it would be unnecessary busy work to put them on the refrigerator list.

Not surprisingly, a study by NDRC (National Resources Defense Council) states that the average American wastes a lot of food – an average of $2200.00 in wasted food a year per family.  Wow!  I’m pretty sure we don’t waste that much, but if we were less careful, I could see that it would be a very possible amount.

Even beyond the money savings, though, the refrigerator list has some unexpected bonuses.  When thinking about dinner plans, what to take to the office for lunch, or even snacks, I can just look at the list.  I don’t even have to open the refrigerator and I especially don’t have to rummage through the shelves to try to figure out what dishes or ingredients we have.  It feels much calmer and simpler and I like that.

Yes, I know, the list is not perfect.  One of us will forget to write on the list, or more likely, will forget to cross something off.  Yet even that is workable because it’s a short list and the turnover, by its nature, is pretty quick.  I can quickly update it as needed when I notice an unlisted item or an item that needs to be crossed off.

My list is still new enough (just a few weeks) that I’m learning the habit of looking at it before I open the refrigerator door and especially before I start dinner.  I’m getting there.

So far it seems to be a good method of saving money on food.  I’m estimating that my refrigerator list is saving $5.00 to $10.00 per week for the two of us.  I’ll have to see if I can figure a way to keep track.  At best I’ll just have to watch how much food is being thrown away and try to compare that to how much we threw away in the past.

This is my kind of savings … reducing landfill waste, making things simpler, and of course, savings on the grocery budget.  Now that’s The Fat Dollar way!

How about you?  What methods do you have for reducing waste on your refrigerated foods?  How do you save money on food? I’d love to see your ideas.

Visit The Fat Dollar website for more money saving tips!

photo courtesy of freedigitalphotos.net and Supertrooper

Clothing and Furniture Donations on Your Tax Return

[Editor’s note – this article was updated on 07-02-19 to reflect current tax years and links]

One common and easy way to help a charity is to donate your good used clothing, furniture, and household goods.

Family Donating StuffBesides a clean house with more usable space, you may also receive a tax deduction for the fair market value of your donations.   A tax deduction on your income tax return can mean more money for you to pay bills, enjoy, invest, or to donate to charity.

To claim a deduction on your 2019 Federal tax return for clothing and furniture donations, you will use the Schedule A (Itemized Deductions).  Yes, this means that you must be able to itemize deductions in order to claim a Federal deduction for a donation in 2019.   In general the total of your itemized deductions (property taxes, mortgage interest, medical expenses, donations, etc.) must exceed $12,200 for single filers or $24,400 for joint filers.   If you are over 65, you get an even higher standard deduction.  Even if a donation does not help your Federal tax return, you may still be able to take a donation deduction on your state tax return.

One common question with donated clothing, furniture and household goods is how to figure the IRS donation values.

The short answer is that you will be able to deduct the lower of the fair market value or your cost basis of the donated property.

Figuring your cost basis is simple.  Your cost basis is how much you paid for the item.  You may also add in any additional costs to improve or prolong the life of the item.  For example, you may have paid $55.00 for a pair of shoes.  $55.00 would be your cost basis.

As another example of cost basis with extra costs, you may have paid  $50.00 for a dresser at a garage sale, and then another $25.00 to buy new handles, glue, and paint to improve it.  Your cost basis in the dresser would be $75.00.

Note, though, that the amount you can deduct is the lower of the cost basis or the fair market value. For most taxpayers, fair market value is what they will use on their tax return to value their donations.

So how do you figure the fair market value of donations?  Good question and the simple answer is:  fair market value is the amount that you could sell the item for.   Usually this will be the thrift shop or garage sale price.

Here are some resources to help you value your donated goods:

Goodwill Industries –  Donation Value Guide   This Goodwill page has a link to a downloadable booklet which gives guideline values for clothing, household goods, and furniture. The link is toward the bottom, under the section Taxes and Your Donations. For example, according to the Goodwill guide, a woman’s shirt in good condition would have a fair market value of $2.00 – $12.00.

The Salvation Army also has a guide – Valuation Guide for Salvation Army Donations  In their guide, the Salvation Army values a woman’s blouse between $2.50 and $12.00, similar to the Goodwill values.

If you frequently shop at garage sales or thrift shops, then you likely already know what prices are reasonable for valuing your clothing and other items.

Other things to keep in mind for tax return purposes when donating clothing, or household goods:

The condition of the items must be at least “good” condition before the IRS will allow a deduction.

The donation must be made to a qualified charity.  Giving furniture to a deserving family is a worthy action, but it will not be tax deductible because the family is not a qualified charity.  Use IRS Search for Charities – (previously Publication 78) to see if your charity is qualified.

Keep a detailed list of your donated items, or snap multiple photos for your records.  Also keep notes on the date of the donation, the address and name of the charity that you donated to.

If your donation value will be $250.00 or more, be sure to get a signed, dated receipt from the charity.

If all of your noncash donations for the year total $500.00 or more, you will need to report the details on Form 8283.   The Instructions for Form 8283 are also a good resource of information on donations of noncash items.

IRS Publication 561 has good information – Determining the Value of Donated Property

Simple Life Corp has a more detailed article on taxes and giving items to charity – Is Your Donation A Tax Deductible Donation?

How much will a donation of household items affect your Federal taxes?

Let’s use the women’s blouses as an example.  Say you do a major clean-out of your closet and end up donating a variety of 20 women’s blouses in good to excellent condition to Goodwill Industries.  Using Goodwill’s valuation chart, you value these at $8.00 each.  This gives you a deduction of $160.00.  If you can itemize and you are in a 22% tax bracket, you will reduce your taxes by $35.20.  Not bad for an hour or two of cleaning out your closet.

Even better, you’ve helped out a charity, you now have a simpler, less crowded closet, and you got a few extra dollars to donate, spend, or invest. Now that’s The Fat Dollar way!


This article is for guidelines only and not to be considered specific tax advice. Consult your tax professional for specific advice on deducting donated items on your tax return.

Low Cost Home Heating Ideas

Editor’s Note:  Originally published Jan 6, 2014.  Links have been updated.


We’re snowed in today, at least until we can get the driveway plowed and get the vehicles out.   We had a beautiful, dangerous blizzard yesterday.  Today and tomorrow we are under a wind-chill warning.  It’s good to be inside and I am grateful to have electricity and an internet connection.  (And a working boiler.)

Woman wrapped in a blanket to stay warmWhile doing a bit of research, I came across several plans for inexpensive or low cost home heating.  I haven’t tried any of these, but I’m considering it.  You’ll have to make your own judgements about the safety and effectiveness of these.  If anyone has tried these or something similar, it would be wonderful if you would share your experience in the comments.

1)  Build a Solar Air Heating Collector from Soda-Pop Cans:

Greg’s Pop-Can Solar Space Heating Collector

This is not only inexpensive – you use empty soda cans as well as old double paned windows and other found materials – but it looks much nicer than would be expected.  It is somewhat labor intensive as you will need to drill or cut out the ends of each and every pop can.

2)  Mother Earth News – Solar Heat Grabber

DIY Solar Heating with the Heat Grabber

This one claims to cost $32.18 to build, but keep in mind that the article is older so prices are likely higher now.  The unit fits next to a window and is not exactly attractive.  The article has very good information about how to place the unit and what angles and placements are most effective.

3)  Tea Light and Flowerpot Room Heater

No, this is not a joke.  The author claims that this heater will heat a room for the cost of 4 tea lights for about 5 hours.

Clay Pot with Tea Light Room Heating

This one seems like it could be a bit dangerous if you have small children, pets, or if you are a bit clumsy.  It uses small candle flames to create a convection heater.

4)  Electric Heater with a Battery and Ceramic Plate

This one takes some electric wiring knowledge, but that fact that it uses a 1.5v dry cell battery fascinated me.  If you could find a rechargeable battery, this could be a good emergency or portable source of heat.   I don’t know how safe it may be – best to check with the electrician in the family.  Plus it looks like it could be a fire hazard if left unattended!

How to Build an Electric Heater

5)  Solar Heat Panel

Another Mother Earth News article about building a solar panel – this one was designed to add heat to a garage or work shop.

Build a Simple Solar Heater

The designer of this unit is an engineer that wanted to heat his outdoor workshop.

There you are.  5 Ideas for creating low cost home heating from the sun, a battery, or a candle.  If you try any of them, please let us know how it worked and how much it cost.

I have one more idea for staying warm when then temperature outside is -15 degrees F.  Wear thermal sock liners.   They are worn underneath your regular socks.

I bought a pair from Amazon.com to give to my son this Christmas, but when they arrived, they were sparkly silver, thin, and knee-high. Seeing no way he would wear them, I kept them for myself.  Wow!  They are so effective that I am completely warm and comfortable which is a big change for me.   Don’t tell my son … he may want them after all!


photo courtesy of Freedigitalphotos.net and marin


Using a Dime to Save a Dollar – Inexpensive Bag Clips Keep Food Fresh

Editor’s Note:  Originally published 09-11-11

Keeping food tightly sealed while stored on the shelf is an excellent way to stretch your food budget.

I bought a set of plastic clothespins (see photo on the left) for less than 10 cents each.  These pins do a great job of keeping plastic and wax bags sealed tightly.  I simply fold the liner and hold it in place with one or two clips. They are colorful and easy to use.


Cereal stays fresh and crispy up to 3 months longer when the liner is folded and sealed after each use.  They can be used for sealing bread, chips, crackers, pet food, and even in the freezer for items such as french fry bags and frozen fruit bags.

I’ve tried using the clips designed and sold specifically as food bag clips, but they don’t work as well for me as the clothespins.  In addition, the regular food bag clips are dramatically more expensive.  I’ve seen them listed for as much as $6.99 for one food bag clip (check online at Walmart.com).

I’ve posted a longer article at The Fat Dollar Money Saving Tip of the Day.  See  thefatdollar.com  for more details on uses and potential money savings. I estimate that I am saving up to $100.00 or more a year on food by using these as bag clips to keep food tightly sealed.

Clip on a bag of cereal


Wooden clothespins work, too, but they don’t seem to be quite as durable as the plastic clothespins.  The plastic ones also have the advantage of coming in a variety of colors and they look more attractive on the food bags.

This is a good example of finding fun and inexpensive ways to save money on food.  It also makes for fewer trips to the grocery store to replace food that has gone stale while on the shelf, so you are saving time, too.

It’s nice to use and enjoy what you already have. Knowing that you already have plenty of something is a way to expand your feeling of abundance. Now that’s the Fat Dollar way.


Vinegar and Baking Soda – Not Exactly Frugal for the Laundry

Sooner or later it has to be dealt with:  the laundry.  The typical American household does almost 400 loads of laundry a year*, or an average of 7- 8 loads of laundry a week.  Saving just a small amount of money on each load of laundry can add up to substantial savings over the years.


Laundry hung on a clothesline
Strong wind blows the clothes hung on the clothesline — Image by © Royalty-Free/Corbis

In my house, we do only half the average amount of  laundry – usually 3-4 loads a week.   I often substitute vinegar or baking soda for fabric softener.  I have usually been pleased with myself for being so frugal and saving a bit of money on each load.

One day while I was in the laundry room and thinking about the actual cost of vinegar and baking soda, a vague uneasiness began to settle in.  How could it be cheaper?  It began to bother me.  Did it really save money to use vinegar or baking soda instead of fabric softener?

I decided to find out.

I’ve posted the calculations and pricing details in an article on The Fat Dollar site  – Making Homemade Fabric Softener with Baking Soda or Vinegar – Does it Really Save Money? . I’ll just give the results here.

It’s not what I wanted it to be, but more or less what that uneasy feeling told me to expect.

The results of the math showing the cost per rinse load:

Fabric Softener – Cost is $.04 *  to $.08** per load

Vinegar – Cost is $.06 (using 1/2 cup) to $.11 (using 1 cup) per load

Baking Soda – Cost is $.12*  to $.24**  per load

Fabric Softener
*Sam’s Club Members Mark Brand
**Final Touch Ultra

Baking Soda
*Sam’s Club
**Walgreens

Vinegar could be possibly less expensive than fabric softener, assuming that you use only 1/2 cup and compare it against the most expensive brand of fabric softener (Final Touch Ultra in my case).  Even then, the savings are only $.02 per rinse load.

Using baking soda instead of fabric softener is a downright luxury if you use costs as an indicator.  The baking soda is 3 to 6 times more costly than fabric softener.  Who would have thought that it is splurging when you dump a half cup of baking soda in the rinse cycle?

Even with little or no monetary savings in the short term, there still are some very valid reasons to skip the fabric softener and use vinegar (or baking soda, if you really want to be a big spender).

  • Vinegar brightens whites and helps to preserve colors
  • Vinegar cuts through soap and fabric softener build-up and helps to rinse it away
  • Vinegar helps to remove odors from clothing
  • Vinegar is a natural product without dyes or perfumes
  • Vinegar can help to remove soap buildup in the washing machine and hoses
  • Baking soda helps to eliminate odors
  • Baking soda naturally softens water
  • Baking soda has no dyes or perfumes

While there really is little or no cost savings by using vinegar or baking soda in the rinse cycle, I will still use these in the laundry.  I like the freedom from chemicals and perfumes on my clothing.

Since I often make my own laundry soap, vinegar is a good complement to this.  Vinegar in the rinse cycle helps to get all the soap rinsed out of the clothing.

Lastly, I think I will probably always use baking soda and vinegar in the laundry because I like using natural products.  It just feels so right.

How about you?  Do you prefer fabric softener or vinegar in the rinse cycle?


*According to The California Energy Commission, Consumer Energy Center

Visit US National Parks – Free Admission Days

camping tent Editor’s note:  This post has been updated with updated prices and links  06-21-19

One of my family’s yearly summer activities was camping.  My dad was a big fan of tent camping – he believed that camping out in an RV, such as a travel trailer or camper, was not really camping.  We visited nearly every state park in Indiana.  Or did we end up visiting all of them?  I don’t remember.  I’ll have to ask my Dad! It was one of his personal goals to visit them all.

My aunt, on the other hand, was a firm believer in camping out in a camper.  She had a truck and a fifth wheel camper and she traveled all over the US, and even ventured into Canada, for her camping excursions.  On several lucky occasions, she invited me to go along with her and her daughter, Toni.  My grandma went, too, on at least one trip. My cousin Toni, a couple of years older than me, was always thrilled to share the experience with me and we headed straight for the park’s stables to ride the horses as often as possible. We even had a song about riding horses that we made up that we sang as we walked the trails to the stables.

Those camping days are some of my best childhood memories.  Unlike my Dad, I loved both tent camping and RV camping.  Either way there was a crackling  campfire and a table for playing cards and eating outdoor cooked meals.  There was clear, clean air that was filled with the essence of lakes, grasses, leaves, flowers, and adventure. There were camping neighbors with guitars and stories.  Best of all, there was the beautiful expanse of woods, creeks, lakes, hiking trails, bicycle paths, and fascinating bugs, birds, and animals.

We did have a raccoon that terrorized our camping site one year, but that is another story.

I encourage you to experience this on your own or with your family, especially if you have kids.  If you already own camping gear or can borrow it, the cost is very low.

 National Parks Free Admission Days

Waterfal and trees

In 2019, there are five days where admission is free to all National Parks.  The days are:  January 21, April 20, August 25, September 28, and November 11.

For more information visit the US National Park Service Site.

The savings will vary, since entrance fees will vary by park.  For example, the entrance fee to the Grand Canyon National Park is $35.00 for a vehicle  or $20.00 for an individual on foot or bicycle.  Yellowstone National Park has similar fees, including the motorcycle entrance fee of $30.00.  In Michigan, the Sleeping Bear Dunes National Lakeshore entrance fee is $25.00 per vehicle or $15.00 per adult on foot.

In addition,  268 of the 401 National Parks do not charge an admission fee, so you can visit these parks anytime for little or no cost.

Note that you will still pay any camping fees or other regular fees during the free admission days.

List of National Parks that Offer Free Admission Days

A list of all the National Parks that are eligible for the national parks free admission days as well as the regular park entrance fees can be seen at the National Parks Blog.

You can also see a list of participating parks for the free entrance days at the nps.gov site – Free Entrance Days – Participating Parks by State

Complete list of all National Parks

Here is a link to a complete list of all the National Parks.   I was not able to find a list of all of the parks that do not have a regular entrance fee, but you should be able to find information on any national parks that interest you by starting there.

Free admission days are offered every year by published schedule.  Just check the above links for the new schedule.

Activities at the National Parks

You can download a free guide to the National Parks. 

Besides being an awesome photo opportunity, the parks offer hiking, boating, kayak tours, nature lessons, historic sites and tours, festivals, concerts, railroad train rides, apple picking, and of course, camping.

Here is a link to a list of some of the activities offered at various parks.

If you like the experience, an annual National Park pass is a bargain at $80.00.  This pass is free for US military members and their dependent families.

US citizens age 62 or over can get a lifetime pass for $80.00.  ($90.00 if ordered by mail.)

Whether free or at a reduced price, a visit to a state or national park is a rich experience that makes for lifetime memories.

The gorgeous photos are courtesy of freedigitalphotos.net and photographers wiangya and prozac1.

Review Your Regular Bills for Hidden Savings

Editor’s Note:  this post is updated from an original post

NWoman Paying Billsow is a good time to review your regular bills. Make a list of the bills that are paid regularly, such as electric and gas bills, internet and TV, cell phone, trash service, home and auto insurance, etc.

Start with the monthly bills and select one. Review every line item on the bill. Do you understand everything that you are being charged for? Are there items on the bill that you don’t need or use anymore? Are you being charged to rent a piece of equipment that you don’t have anymore?

For internet, TV service, and other similar bills, if you have had the same service package for a year or more, call the customer service center and ask if there are any discounts or different packages that may be available.

I recently called my internet and cable TV service and found that we were eligible for a free upgrade to a much faster internet service. The customer service rep did the upgrade while I was still on the phone. While that call didn’t save any monthly money, I felt it was a very worthwhile call. I am thrilled with the faster internet speed. As well, she gave me another number to call because it appeared that we were also eligible for a lower-cost package. I’ll be calling that number soon!

Go through each of your regular bills one by one, slowly and in detail. If you find a charge that should not be there, make the call or send the email and get the process started to get it eliminated. While it may only be a few dollars of savings, keep in mind that a few dollars each month adds up. Saving $5.00 a month is a savings of $60.00 a year. What would you do if someone handed you $60.00 at the end of each year?

Credit card bills should be reviewed each and every month as they arrive. Did you sign up for a monthly “club” that you haven’t used in 3 months, but are still getting a $19.99/month charge? Did a company accidentally double bill you for something? Are there charges you don’t recognize? Even a $.25 charge that you didn’t authorize should be investigated. It may be a test charge by a card thief to see if the card is good as well as to see if they are able to make undetected charges on your account.

A periodic review of your regular bills helps to prevent money being completely wasted on services or items that you no longer use or need.

Even better, as soon as you discover and remove an unnecessary charge, set up an automatic monthly transfer of that amount to your savings account. You won’t miss the money and your savings account will start growing effortlessly.

Take a look at The Fat Dollar’s post on Automatic Investing for more ideas on increasing your regular savings.

Photo courtesy of freedigitalphotos.net and patpitchaya.